Activiti 工作流引擎(3)
添加一个简单的工作流

创建一个简单的工作流引擎,需要准备:数据库、工作流文件(BPMN)。创建工作流的基本流程: 构建 ProcessEngineConfiguration 对象 –> 设置数据库连接 –> 设置数据库表创建属性 –> 构建一个流程引擎。其中:ProcessEngineConfiguration 对象,是构建一个简单工作流的核心 API。
为了简单的示例操作,使用 Junit 创建测试用例创建即可。

创建简单的工作流引擎

创建工作流引擎的三个方法:

  • 使用 ProcessEngineConfiguration 硬编码配置数据库连接创建
  • 使用 ProcessEngineConfiguration + activiti.cfg.xml 文件创建
  • 使用 ProcessEngines 默认配置创建

使用 ProcessEngineConfiguration 创建

使用 ProcessEngineConfiguration 创建工作流引擎时,需要指定好数据库、库表创建策略等

1
2
3
4
5
6
7
8
9
10
11
12
13
14
15
16
17
// 1、取得 ProcessEngineConfiguration 对象
ProcessEngineConfiguration configuration = ProcessEngineConfiguration.createStandaloneProcessEngineConfiguration();
// 2、设置数据库属性
configuration.setJdbcDriver("com.mysql.jdbc.Driver");
configuration.setJdbcUrl("jdbc:mysql:///activiti?createDatabaseIfNotExist=true&useUnicode=true&charsetEncoding=utf8&serverTimezone=Hongkong");
configuration.setJdbcUsername("root");
configuration.setJdbcPassword("123456");

// 3、设置创建表的策略,没有表时自动创建
// DB_SCHEMA_UPDATE_TRUE 没有表时自动创建
// DB_SCHEMA_UPDATE_FALSE 不自动创建
// DB_SCHEMA_UPDATE_CREATE_DROP 先删除表再自动创建
configuration.setDatabaseSchemaUpdate(ProcessEngineConfiguration.DB_SCHEMA_UPDATE_TRUE);

// 创建流程引擎
processEngine = configuration.buildProcessEngine();
System.out.println("流程创建成功");

使用 ProcessEngineConfiguration + activiti.cfg.xml 文件创建

此种创建方式,实际上是将数据库的链接配置,设置在了 xml 文件中。

activiti.cfg.xml 文件

1
2
3
4
5
6
7
8
9
10
11
12
13
14
<?xml version="1.0" encoding="UTF-8"?>
<beans xmlns="http://www.springframework.org/schema/beans"
xmlns:xsi="http://www.w3.org/2001/XMLSchema-instance"
xsi:schemaLocation="http://www.springframework.org/schema/beans http://www.springframework.org/schema/beans/spring-beans.xsd">

<!-- ProcessEngineConfiguration 是一个抽象类,不能作为一个 Bean,需要指定具体的实现类作为 Bean -->
<bean id="processEngineConfiguration" class="org.activiti.engine.impl.cfg.StandaloneProcessEngineConfiguration">
<property name="jdbcUrl" value="jdbc:mysql:///activiti?createDatabaseIfNotExist=true&amp;useUnicode=true&amp;charsetEncoding=utf8&amp;serverTimezone=Hongkong" />
<property name="jdbcDriver" value="com.mysql.jdbc.Driver" />
<property name="jdbcUsername" value="root" />
<property name="jdbcPassword" value="123456" />
<property name="databaseSchemaUpdate" value="true" />
</bean>
</beans>

代码示例

1
2
3
ProcessEngineConfiguration configuration = ProcessEngineConfiguration.createProcessEngineConfigurationFromResource("activiti.cfg.xml");
processEngine = configuration.buildProcessEngine();
System.out.println("流程创建成功");

使用 ProcessEngines 默认配置创建

使用 ProcessEngines 默认配置,实际上和 使用 xml 配置是一样的,因为使用 ProcessEngines 时会默认读取 activiti.cfg.xml 文件

1
2
processEngine = ProcessEngines.getDefaultProcessEngine();
System.out.println("流程创建成功");

ProcessEngines 重点源码分析:

1
2
3
4
5
6
7
8
9
10
11
12
13
14
15
16
17
18
19
20
21
22
23
24
25
26
27
28
29
30
31
32
33
34
35
36
37
38
39
40
41
42
43
44
45
46
47
48
49
50
51
52
53
54
55
56
57
58
59
60
61
62
63
64
65
66
67
68
69
70
71
72
73
74
// 默认配置
ProcessEngines.getDefaultProcessEngine();

// 获取默认配置
public static ProcessEngine getDefaultProcessEngine() {
return getProcessEngine("default");
}

// 是否已经初始化
public static boolean isInitialized() {
return isInitialized;
}

// 获取默认配置
public static ProcessEngine getProcessEngine(String processEngineName) {
// 此时调用肯定是没有初始化的,所以会调用 init 方法
if (!isInitialized()) {
init();
}
return processEngines.get(processEngineName);
}

// 初始化方法
public synchronized static void init() {
// 此时 isInitialized 为 false
if (!isInitialized()) {
// 如果 processEngines 为空,重新构造
if (processEngines == null) {
// Create new map to store process-engines if current map is
// null
processEngines = new HashMap<String, ProcessEngine>();
}
ClassLoader classLoader = ReflectUtil.getClassLoader();
Enumeration<URL> resources = null;
try {
// 获取默认的 activiti.cfg.xml 配置
resources = classLoader.getResources("activiti.cfg.xml");
} catch (IOException e) {
// 如果获取不到会报错
throw new ActivitiIllegalArgumentException("problem retrieving activiti.cfg.xml resources on the classpath: " + System.getProperty("java.class.path"), e);
}

// Remove duplicated configuration URL's using set. Some
// classloaders may return identical URL's twice, causing duplicate
// startups
// 解析 xml 文件
Set<URL> configUrls = new HashSet<URL>();
while (resources.hasMoreElements()) {
configUrls.add(resources.nextElement());
}
for (Iterator<URL> iterator = configUrls.iterator(); iterator.hasNext();) {
URL resource = iterator.next();
log.info("Initializing process engine using configuration '{}'", resource.toString());
initProcessEngineFromResource(resource);
}

try {
// 获取 activiti-context.xml(和 activiti.cfg.xml 一样,不过是名字规定的不一样)
resources = classLoader.getResources("activiti-context.xml");
} catch (IOException e) {
throw new ActivitiIllegalArgumentException("problem retrieving activiti-context.xml resources on the classpath: " + System.getProperty("java.class.path"), e);
}
while (resources.hasMoreElements()) {
URL resource = resources.nextElement();
log.info("Initializing process engine using Spring configuration '{}'", resource.toString());
initProcessEngineFromSpringResource(resource);
}

// 设置 isInitialized 为 true,标记为已初始化
setInitialized(true);
} else {
log.info("Process engines already initialized");
}
}

部署一个简单的工作流

在创建工作流成功,并且创建 BPMN 文件后,可以进行流程的部署。流程部署需要用到仓库服务,即 RepositoryService

部署操作代码示例

1
2
3
4
5
6
7
8
9
// 获取仓库服务:管理定义流程
RepositoryService repositoryService = processEngine.getRepositoryService();
// 创建部署
Deployment deploy = repositoryService.createDeployment() // 返回部署的构建器
.addClasspathResource("LevelBill.bpmn") // 从类路径下添加资源
.name("LevelBill:请假单流程") // 设置部署的名字
.category("办公类别") // 设置类别
.deploy(); // 部署
System.out.println("部署成功后返回的 id:" + deploy.getId() + ",部署的名称:" + deploy.getName());

查看部署结果

  • 查看 act_re_deployment 表

部署结果

  • 查看 act_re_prrocdef 表

部署结果

bpmn 文件:

1
<process id="levelBill" isClosed="false" isExecutable="true" name="LevelBill" processType="None">

其中: KEY_ 指向 BPMN 文件中 的 id, NAME_ 指向 BPMN 文件中的 name,_DEPLOYMENT_ID_ 指向 act_re_deployment 表的 id,RESOURCE_NAME_ 指向 构建 deploy 时的 classpathResource 的值

  • 查看 act_ge_property 表

部署结果

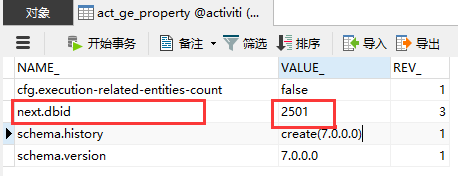
其中:next.dbid 的值VALUE_ 即为下一步运行部署操作时,act_re_deployment 的 id。

再次运行部署操作

再次运行部署操作,查看 act_ge_propertyact_re_deployment 表,可以看到 act_ge_property 的 next.dbid 的值变了,且 act_re_deployment 的中 id 变为上一次运行后 act_ge_property 的 next.dbid 的值。


-------------本文结束 感谢您的阅读-------------
0%