Spring Batch – 一个基于 Spring 架构的批处理框架 什么是批处理 在现代企业应用当中,面对复杂的业务以及海量的数据,除了通过庞杂的人机交互界面进行各种处理外,还有一类工作,不需要人工干预,只需要定期读入大批量数据,然后完成相应业务处理并进行归档。这类工作即为“批处理”。 如:银行、移动、电信等公司需要每个月的月底统一处理用户的剩余金额、流量、话费等,这是一个很大的工程。如果全部使用人工操作的话,可能几个月都统计不了,这时就需要一套已经制定好规则的处理方案,按照制定好的方案,程序进行自动处理。
从上面的描述可以看出,批处理应用有如下几个特点:
数据量大,少则百万,多则上亿的数量级。 不需要人工干预,由系统根据配置自动完成。 与时间相关,如每天执行一次或每月执行一次。 同时,批处理应用又明显分为三个环节:
读数据,数据可能来自文件、数据库或消息队列等 数据处理,如电信支撑系统的计费处理 写数据,将输出结果写入文件、数据库或消息队列等 因此,从系统架构上,应重点考虑批处理应用的事务粒度、日志监控、执行、资源管理(尤其存在并发的情况下)。从系统设计上,应重点考虑数据读写与业务处理的解耦,提高复用性以及可测试性。
SpringBatch 的业务场景 周期性的提交批处理 把一个任务并行处理 消息驱动应用分级处理 大规模并行批处理 手工或调度使用任务失败之后重新启动 有依赖步骤的顺序执行(使用工作流驱动扩展) 处理时跳过部分记录(错误记录或不需要处理的记录) 成批事务:为小批量的或有的存储过程/脚本的场景使用 SpringBatch 集成操作 ### Spring 官方推荐使用 SpringBoot 作为 SpringBatch 的容器框架。 SpringBoot 作为 Spring 官方提供的一款轻量级的 Spring 全家桶整合框架,基于 习惯优于配置 的特点,有以下几个重点特征:
基本没有或极少的配置即可启动 Spring 容器 创建独立的Spring应用程序 嵌入的Tomcat,无需部署WAR文件 简化Maven配置 自动配置Spring 提供生产就绪型功能,如指标,健康检查和外部配置 绝对没有代码生成并且对XML也没有配置要求 SpringBoot 集成 SpringBatch 简单实例(使用 IDEA) 创建一个 SpringBoot 项目 File –> new –> project –> Spring Initialzer
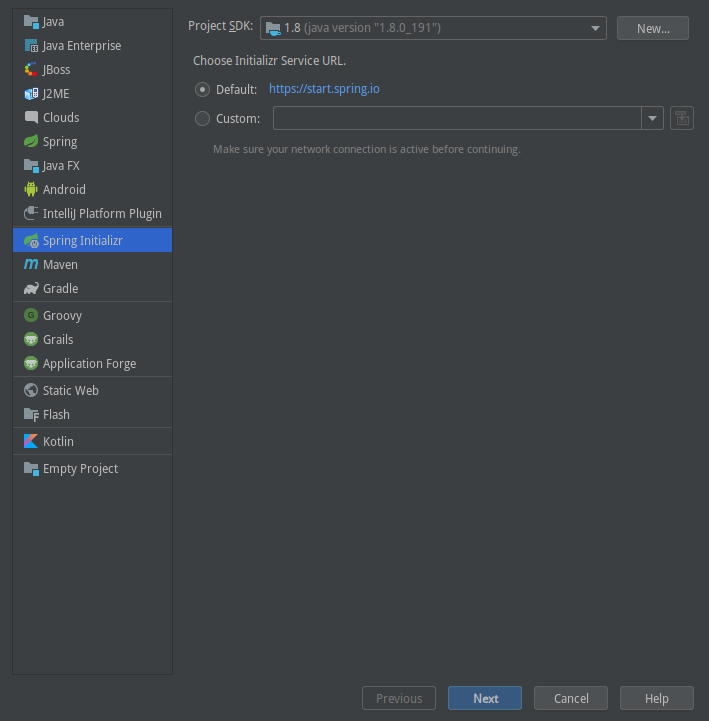
填写 groupId、artifactId
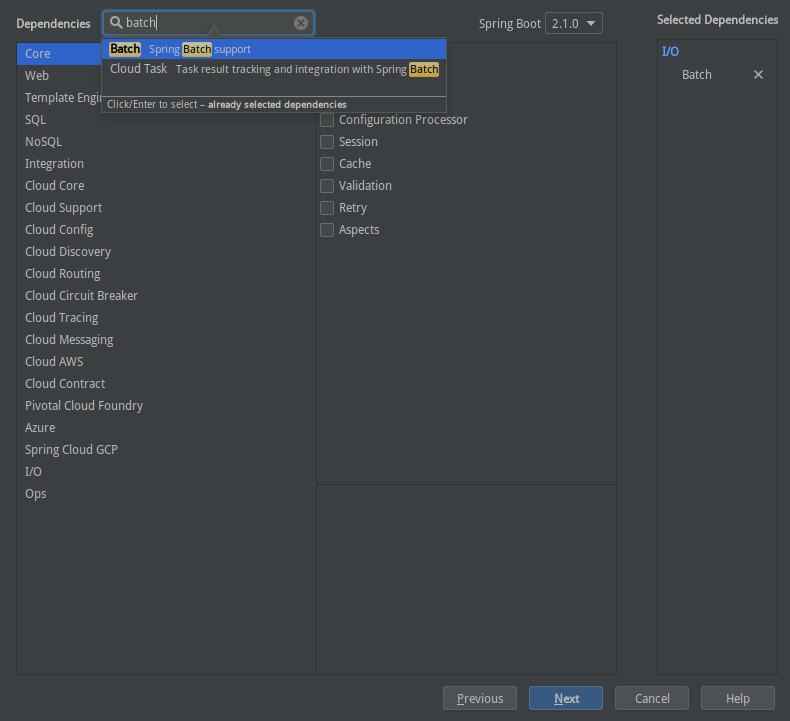
选择需要的依赖(由于是简单实例,所以只需要 batch 的依赖即可)
完整 pom.xml 文件
1 2 3 4 5 6 7 8 9 10 11 12 13 14 15 16 17 18 19 20 21 22 23 24 25 26 27 28 29 30 31 32 33 34 35 36 37 38 39 40 41 42 43 44 45 46 47 48 49 50 51 52 53 54 55 56 <?xml version="1.0" encoding="UTF-8"?> <project xmlns ="http://maven.apache.org/POM/4.0.0" xmlns:xsi ="http://www.w3.org/2001/XMLSchema-instance" xsi:schemaLocation ="http://maven.apache.org/POM/4.0.0 http://maven.apache.org/xsd/maven-4.0.0.xsd" > <modelVersion > 4.0.0</modelVersion > <groupId > com.laiyy</groupId > <artifactId > batch</artifactId > <version > 0.0.1-SNAPSHOT</version > <packaging > jar</packaging > <name > batch</name > <description > Demo project for Spring Boot</description > <parent > <groupId > org.springframework.boot</groupId > <artifactId > spring-boot-starter-parent</artifactId > <version > 2.1.0.RELEASE</version > <relativePath /> </parent > <properties > <project.build.sourceEncoding > UTF-8</project.build.sourceEncoding > <project.reporting.outputEncoding > UTF-8</project.reporting.outputEncoding > <java.version > 1.8</java.version > </properties > <dependencies > <dependency > <groupId > org.springframework.boot</groupId > <artifactId > spring-boot-starter-batch</artifactId > </dependency > <dependency > <groupId > org.springframework.boot</groupId > <artifactId > spring-boot-starter-test</artifactId > <scope > test</scope > </dependency > <dependency > <groupId > org.springframework.batch</groupId > <artifactId > spring-batch-test</artifactId > <scope > test</scope > </dependency > </dependencies > <build > <plugins > <plugin > <groupId > org.springframework.boot</groupId > <artifactId > spring-boot-maven-plugin</artifactId > </plugin > </plugins > </build > </project >
开始第一个简单示例 demo 示例编码步骤 引入 JobBuilderFactory、StepBuilderFactory,用于创建任务、任务执行的步骤 使用 JobBuilderFactory 创建一个任务 使用 StepBuilderFactory 创建这个任务要执行的步骤 启动项目,查看运行结果 需要注意的地方: 将所有操作在一个类中完成,便于理解代码 需要在这个类上加入 @Configuration、@EnableBatchProcessing 注解 直接启动主进程即可在控制台查看到运行结果 注解 @Configuration
等价于在 spring-context.xml 中声明一个 <bean>
节点 注解 @EnableBatchProcessing
用于告诉 Spring 容易自动装配 SpringBatch 相关默认配置
具体代码: 1 2 3 4 5 6 7 8 9 10 11 12 13 14 15 16 17 18 19 20 21 22 23 24 25 26 27 28 29 30 31 32 33 34 35 36 37 38 39 40 41 42 43 44 45 46 47 48 49 @EnableBatchProcessing @Configuration public class ChildJob1 { private final JobBuilderFactory jobBuilderFactory; private final StepBuilderFactory stepBuilderFactory; @Autowired public ChildJob1 (StepBuilderFactory stepBuilderFactory, JobBuilderFactory jobBuilderFactory) { this .stepBuilderFactory = stepBuilderFactory; this .jobBuilderFactory = jobBuilderFactory; } @Bean public Job childJobOne () { return jobBuilderFactory.get("childJobOne" ) .start(childJobStep1()) .build(); } @Bean public Step childJobStep1 () { return stepBuilderFactory.get("childJobStep1" ) .tasklet(new Tasklet() { @Override public RepeatStatus execute (StepContribution stepContribution, ChunkContext chunkContext) throws Exception { System.out.println("childJobStep1" ); return RepeatStatus.FINISHED; } }).build(); } }
验证运行结果 启用 Application 主进程,查看控制台,发现报错如下:
1 2 3 4 5 6 7 8 9 10 11 12 13 14 15 16 17 18 19 Error starting ApplicationContext. To display the conditions report re-run your application with 'debug' enabled. 2018-11-28 22:48:24.326 ERROR 9226 --- [ main] o.s.b.d.LoggingFailureAnalysisReporter : *************************** APPLICATION FAILED TO START *************************** Description: Failed to configure a DataSource: 'url' attribute is not specified and no embedded datasource could be configured. Reason: Failed to determine a suitable driver class Action: Consider the following: If you want an embedded database (H2, HSQL or Derby), please put it on the classpath. If you have database settings to be loaded from a particular profile you may need to activate it (no profiles are currently active).
错误原因: SpringBatch 运行任务、Step 的时候,会进行持久化(可能是内存中、或者是数据库中,默认是数据库),所以再次我们需要引入一个数据库。作为一个 示例程序 ,引入内存级数据库 h2 即可
需要在 pom.xml 中加入如下配置:
1 2 3 4 5 <dependency > <groupId > com.h2database</groupId > <artifactId > h2</artifactId > <scope > runtime</scope > </dependency >
再次启动项目,查看控制台,可以看到控制台打印信息如下
1 2 3 4 5 6 7 8 9 10 11 12 13 . ____ _ __ _ _ /\\ / ___'_ __ _ _(_)_ __ __ _ \ \ \ \ ( ( )\___ | '_ | '_| | '_ \/ _` | \ \ \ \ \\/ ___)| |_)| | | | | || (_| | ) ) ) ) ' |____| .__|_| |_|_| |_\__, | / / / / =========|_|==============|___/=/_/_/_/ :: Spring Boot :: (v2.1.0.RELEASE) ... childJobStep1 ...
此时可以看到,我们在 Tasklet 中输出的字符串成功打印在了控制台中,证明 SpringBatch 的简单示例启动、验证成功。